Set up SDK
Before setting up an SDK, let's decipher the essence of SDK and find out how it works on the transport layer.
SDKs work differently on various platforms. Therefore, for our discussion, we'll organize them into WebGL SDKs and SDKs for other platforms, and we'll be focusing our discussion on the latter one.
First things first, to send transactions, we have to connect the mobile wallets — we do that via Wallet Connect.
Wallet Connect
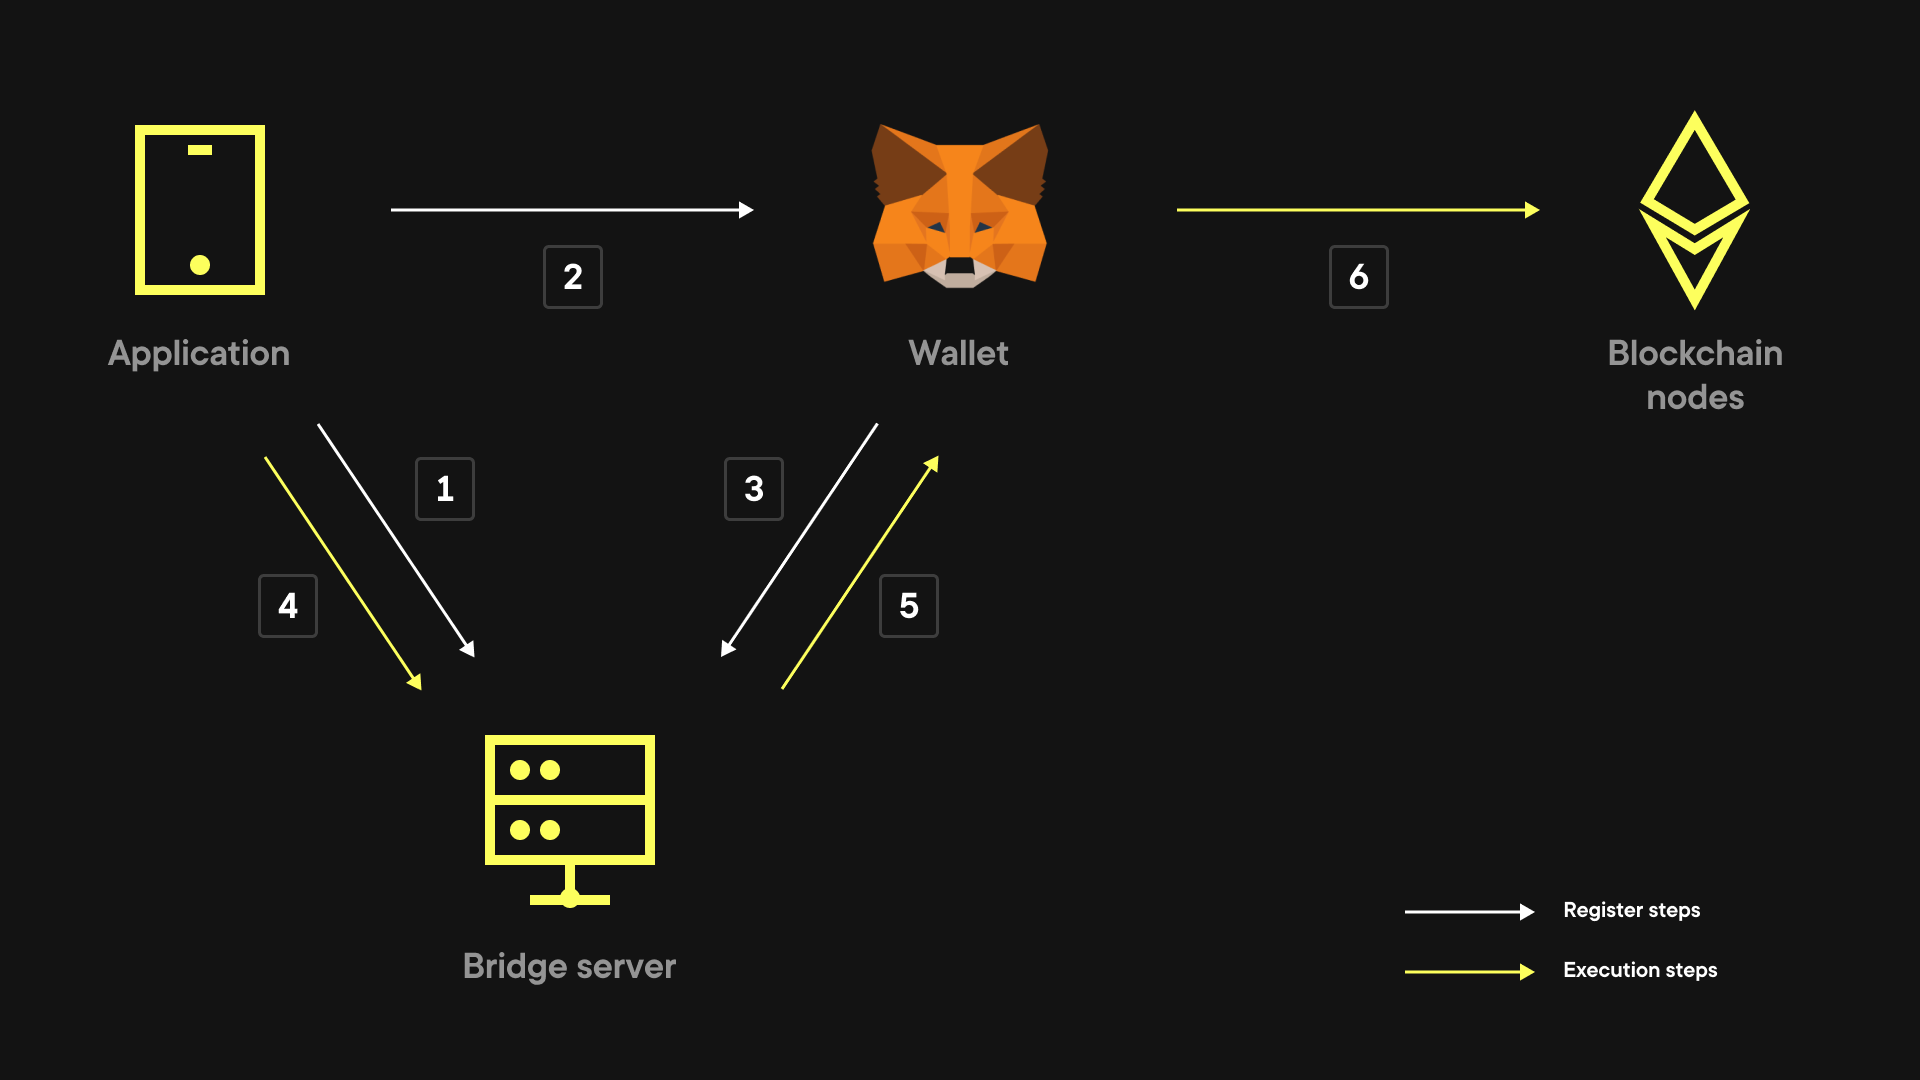
WalletConnect consists of 3 participants: your application, a bridge server, and a mobile wallet. The only participant that might need an explanation is the bridge server — a dedicated server that registers applications and wallets and works like a proxy for a wallet-application interconnection. Further, we'll describe how to use it.

Let's dig into the five steps of how the protocol works:
- Your application connects with the bridge server.
- Your application shares the bridge server's session ID and address with a mobile wallet (using a deep link or QR code).
- The mobile wallet connects with the bridge server, which makes it connected to your application.
- Your application prepares a transaction and sends it to the bridge server.
- The bridge server transfers that transaction to your mobile wallet.
- The mobile wallet performs the transaction and sends back its result.
Of course, that's an oversimplification of a protocol, but that's more than enough for the purpose of our article.
The SDK provides methods for connection execution steps, but creating that connection is the responsibility of SDK users.
For test purposes, you can use the ConnectionController class. It allows for a simple connection process across various platforms. But you still need to implement your own connector or modify ConnectionController according to your specific game.
How to implement your connector
The heart of the connection process is the WalletConnect class. It stores connection metadata and provides actions to start, finish, and pause a connection according to an application state. WallectConnect doesn’t extend MonoBehaviour — you need to implement your own MonoBehaviour class over it.
Create connection
To connect, you have, first, to call Connect() and then make sure to call the methods OnApplicationPause(), Update(), and Quit() in the same sequence as they are called by the Unity events in WalletConnectUnityMonoAdapter.
public class WalletConnectMonoBehaviourUsageExample : MonoBehaviour
{
	private WalletConnect _walletConnect;

	private async void Awake()
	{
		_walletConnect = new WalletConnect();
		var settings = Resources.Load<WalletConnectSettingsSO>("WalletConnectSettings");
		_walletConnect.Initialize(settings);
		await _walletConnect.Connect();
	}

	private void Update()
	{
		_walletConnect?.Update();
	}

	private async void OnApplicationPause(bool pause)
	{
		if (_walletConnect != null)
		{
			await _walletConnect.OnApplicationPause(pause);
		}
	}

	private async void OnApplicationQuit()
	{
		if (_walletConnect != null)
		{
			await _walletConnect.Quit();
		}
	}

	private async void OnDestroy()
	{
		if (_walletConnect != null)
		{
			await _walletConnect.Quit();
		}
	}
}
Alternatively, you can use WalletConnectUnityMonoAdapter added to your scene and then add a WalletConnect instance to WalletConnectUnityMonoAdapter in runtime using the TryAddObject() method. Using that option, make sure WalletConnectUnityMonoAdapter is a component of an active game object.
public class WalletConnectUsageExample
{
	public async void LaunchWalletConnect(WalletConnectUnityMonoAdapter adapter)
	{
		var walletConnect = new WalletConnect();
		var settings = Resources.Load<WalletConnectSettingsSO>("WalletConnectSettings");
		walletConnect.Initialize(settings);
		adapter.Clear();
		adapter.TryAddObject(walletConnect);
		await walletConnect.Connect();
	}
}
Alternatively, you can use the ConnectProvider class to do the same thing with less effort. If you choose this option, make sure WalletConnectUnityMonoAdapter is a component of an active game object.
public class ConnectProviderUsageExample
{
  public async void LaunchWalletConnect()
  {
    var walletConnect = ConnectProvider<WalletConnect>.GetConnect();
    await walletConnect.Connect();
  }
}
Controlling the process
The connection process is characterized in WalletConnect by these six statuses: Uninitialized, DisconnectedNoSession, DisconnectedSessionCached, TransportConnected, SessionRequestSent, and WalletConnected
The initial status is Uninitialized. If we call the WalletConnect.Connect() method, the status is set to DisconnectedNoSession if no session is cached locally. If the session has been cached locally from previous usages, then the status changes to DisconnectedSessionCached. If the status is DisconnectedSessionCached, then it will transition to WalletConnected right after the internal transport layer WebSocket connection opens. If the status is DisconnectedNoSession then it will transition to TransportConnected when the transport layer web socket connection opens. TransportConnected transitions to SessionRequestSent once WalletConnect has sent a request to the Bridge server. After a user approves the connection in the wallet app (example: Metamask), WalletConnect gets a response from the Bridge server and sets the status to WalletConnected.
Note that the WalletConnect class provides the SessionStatusUpdated public generic event with current connection statuses.
Wallet opening
Upon receiving SessionRequestSent, you need to help the user open the application. Different platforms have their own way of doing that. To read more about it, refer to this section.